Saturday, September 24, 2016

Flames of War Late War
Soviet Tankovy vs. German Otto Carius JagdTiger and Michael Wittman Tiger Lists

My buddy Karl and I had some great Thai food today then went up to Cullison's games for some FLAMES OF WAR.  Karl graciously brought a couple of 1515pt LW German armies to give me some practice games using the Soviet Tankovy list I'm planning to take to Austin for the Late War Nationals at Bane of War in January.

We roll up SURROUNDED and I get the high die roll to attack.  It's a fairly open winter terrain table with some small line of site braks in the middle with a few hills and a woods or two.  Karl shows me his game face.  GITSUM!


I go heavy on one flank with a Tankovy Company with Dedov and my Spetnatz dismounted with the ISU 122's ready to move up to infiltrate.  My battalion CO is with the assault guns.  A second tank company is down on the far end of the table to threaten the other objective.  The Germans have panzerfaust armed infantry around the near objective with a Jagdtiger on the far hill.  Karl places his immediate ambush and independend team Jagdtigers against my main effort. 
 
My Spetznatz roll the ISU's up into bombardment position against his infantry, Karl rolls a 6!  Ohhhh nooooossss he discoveres my infiltration move and gets first turn!  I get off cheap, though, with an ISU and a T34 destroyed and another T34 bailed, then I attack.


I got to work on his infantry with the assault guns and try to move the T-34's away from the awesome firepower of the Jagdtigers.  An air strike destroys one of his JT's and the other in the platoon gets bailed and runs away.. my right flank is now open for maneuver.. waaahooo!  Karl is pounding me with Carius and his 2iC on my left, unfortunately, but the Soviet juggernaut rumbles forward destroying enemy infantry teams in their foxholes to open up the objective.  The Spetznatz are doing well taking the enemy's Gone to Ground away so they are easier to hit.
 

My other tank company halts to get some long range rear and flank shots against the Jagdtigers.. No sir they don't like it!  Carius and the other JT on the hill turn to engage them and the T34's have to start playing run and hide as they can't hurt the JT's frontal armor at all.


On.. ON for Mother Russia!  German infantry are dying and the Soviet armor advances towards the near objective.


Carius, his wingman, and a Luftwaffe strike finish off the ISU's.. DOH!  At least the German infantry finally break. 

Karl's air support definitely outplayed mine today.. killing lots of my armor and chasing off no less than 6 of my air strikes over two games.  Damn their eyes!  But on this particular strike, my Yak nailed another JagdTiger near the objective.  The Spetznatz have begun to move dismounted towards the objective, too.


Carius keeps his company in the fight, for 5 turns at least, rolling two dice for a 5 to prevent army break.  My Spetznatz finally secure the near objective by a couple of assaults that forces back Carius and the one other Jagdtiger and start their turn within 4 inches of the objective.  I lost the ISU's and a Tankovy Company, so it's a a 4-3 win for the Soviets!  Nice game, Karl.


Game 2 we roll up CAULDRON and I roll low die to defend.  I spread out my T-34 company to help push his deployment back and keep my ISU 122's in Immediate Ambush. I have another T34 Company and Spetnatz in delayed reserve. 

He starts with two 2 tank Tiger platoons on the board with FlaK and Recce in Reserve. 

My ISU 122's quickly reduce his onboard strength to 1 Tiger platoon by destroying the other platoon with their immediate ambush fire from a conveniently wooded hill and it's game on!


Michael Wittman ambushes.  He kills an ISU and bails another.


I hide and play for time.. and luckily on turn 3 my other tank company with Dedov come in behind the enemy Tiger and Flak and Recce platoon, don't kill anything, but the enemy return fire whiffs in return.  With the other Tigers busy, my ISU's and a T34/85 move out and destroy Wittmann.  He didn't make it to Normandy! 


The enemy throws in the towel and it's a 6-1 win for the Soviets.  OOOOORRRAAAHHH for Mother Russia!

Thanks for the practice games, Karl.. good times today!  :)

Sunday, September 18, 2016

FLAMES OF WAR
2,000 pt MW Team Tourney
Eclipse Games, Rolla MO

Great time at the Rolla tourney yesterday!  Our game club had 3 of the 6 teams present.  Mike and I set up a desert table as we were playing a DAK Panzer Kompanie and Afrika Schutzen Kompanie, and of course, we never got close to the desert table hahaha

 
Round 1 we are fighting Blue vs. Blue in BLIND DOMINATION on a nice table our bud Tony set up vs. a team of winter themed German Spah and Pioniers from Novakistan.  I immediately blow our sportsmanship points by using my artillery to smoke their advancing Ferdinand, doing an impressive imitation of an armored train, then punching his top armor with a bomb from a Luftaffe Stuka.  Of course, much hooting and hollering and gesticulating and hilarity ensured.  The Novakistanis were kind to enough to indulge our Orky behavior.  :)


Both teams are basically in a big furball in the middle fighting it out for Domination Points while trying to not get one of our armies destroyed.  We lose a platoon of Panzers to AT and Infantry Gun fire and their Pioniers and a captured KV 1 tank push against a 2 Pt Domination Objective with only my Recce to contest it.  Acckk!  
 
 
So... we go defensive in the middle. I holler "HILFE MICH!", and my team mate Mike sends another Panzer platoon over to machine gun the bejeezus out of the Pioniers and they break.  On the far flank, one of my Schutzen platoons manages to wipe out a AT Gun platoon in assault and cause a 2 point flip on Dominations points, giving us the 5-2 win as time runs out.  Fun game!


Round 2 COUNTERATTACK and we face up with our club buddies Rich and Mike using US Armored Rifles and British Motor Company.  We decide to take a friendly picture before the game.  

 
Then we try to kill each others' armies!  Mike and I are attacking so we ignore the objective in No Man's Land that will easily be reinforced before Turn 6 by Rich's mobile elements coming in from Delayed Reserve, and go for the throat with a power assault by tanks around the right and a push forward by the Infantry.  Mike and Rich, I realized when I saw this that those two PaK 38 guns WERE with the platoon that later got destroyed instead of the platoon on their right.  They should have been picked up before later killing one of our Vickers MG teams.  ACK!  My bad, brothers.

 
We continue to get good service from the Luftwaffe as we use bombs and direct fire from Mk IV F2's to take out the Churchill platoon.  The Germans are laying fire all along the defenders line and causing massive enemy casualties.
 
 
Losing one Schutzen platoon in assault due to some nice work by the Allies defensive fire and then counterattack, the remaining Germans finish off the enemy with artillery, infantry, and tank fire before the enemy's reserves, not beginning to arrive until Turn 3, can interdict.  5-2 Win for the DAK team!

 
Round 3 SURROUNDED we defend facing Will and Ian's KV 1 and Moto Raz Battalions.  They go heavy tank on one flank and Raz and Recce on the other.  We dig in with our AT guns and Artillery in direct fire support mode.  There's very little cover in the center of the field so the Panzers take whatever cover is available, and the enemy attacks. 


Luftwaffe gets some again!  Our Stuka driver did a nice job all day long.  He nails two KVs, 2 Valentines ,and chops up Will's Moto Raz on their main attack flank.  I enjoy my moral victory and am surprised a photobombing Will wasn't giving me Rabbit Ears.. or something worse.. hahah

 
The enemy's main attack, or at least the Battalion Commander's KV and the one remaining in the company jumped by the Stuka, pushes around the heavily defended objective and begins to go for our other flank where our Panzers, Recce, and Schutzen are chopping up the Moto Raz and Recce.  Valentines and Raz keep pressure on the defended objective to try to keep them from flexing to help the other side.  Mike loses a Panzer platoon to the flanking KVs and fire from the other KVs pushing into the center.

 
Ian pushes his other KV company towards the less defended objective, Mike's Panzers close in to help in case of emergencies but the enemy has left his flank exposed to AT and Artillery fire from the other objective!  It blows away the attacking KV 1 Company.

 
The enemy present the universal signal of "Damn you we give up!" and it's another 5-2 win for the DAK team.  Wooohooo!  We win Top Team for the day.


A great day with great friends.. enjoyed everyone's company very much!  See you all at TANKER TREAT in October. :)
Saturday, July 16, 2016

BLACK POWDER NAPOLEONICS
 
Cullison's Cards & Games, Jonesboro, AR
 
For today's fight, we're off to the Peninsula.  Two advance guard divisions are closing on a strategic road junction network, go into bivouac and post pickets for the night, and use their maps to plan their deployments.  The sun comes up the next day, the enemy deployments are revealed, and the battle is joined.  Victory comes to whoever controls both Objectives A and B or destroys the enemy's army.

The British plan is:  1.  Rapid move of their Rifle Companies to seize and hold the buildings at Objective A.  2.  Attack to seize and hold Objective B with an infantry brigade supported by 2 field guns.  3.  Hold their right flank with an infantry brigade and the cavalry brigade.
 
 
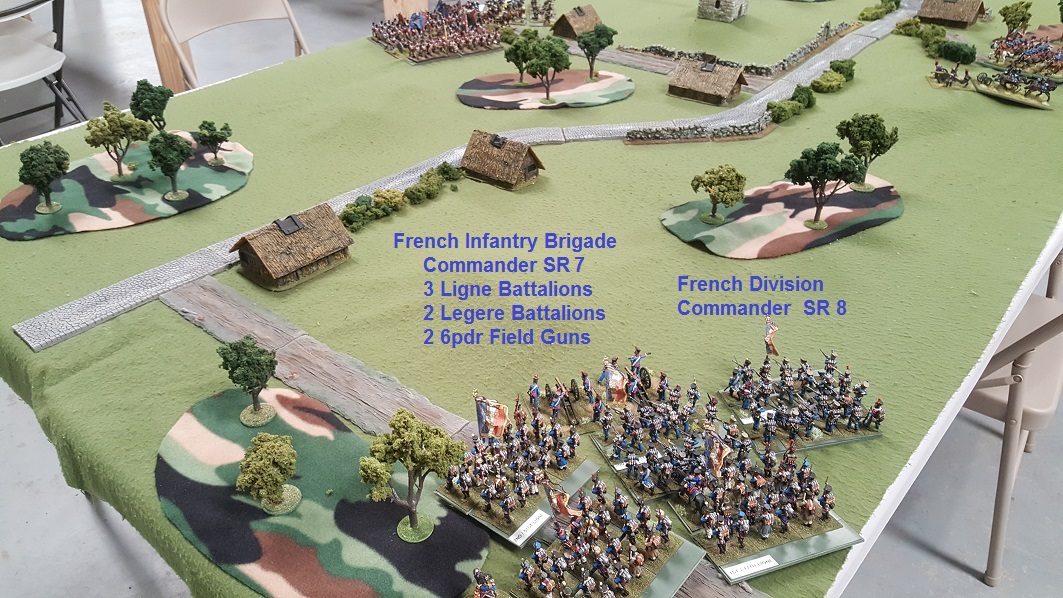
The French plan is:  1. Conduct an economy of force mission on their right with two field guns and a Legere Battalion.  2. Send their main attack Infantry Brigade to seize and hold Objective B while leaving one battalion in square to guard their left flank from cavalry attack.  3.  Support the left flank with Dragoons and a Horse Gun and support the middle or right with Hussars.


The British Cavalry Brigade on their right and their two Infantry Brigades on the right and center.  At the left of their line the Rifle Companies, joined by Wellington to expedite their move, are ready to head to Objective A with all speed! 


The French main attack.. a veritable sledgehammer of 5 Ligne in assault columns, a Legere battalion in skirmish screening their advance, and the valiant battalion selected to move out in to the gap between the woods and the farm wall, form square, plant their Eagle, and hold that flank from marauding enemy cavalry!


The British send a battalion forward into the woods in skirmish order and the rest of their brigade forms line well to the rear.  The French, sensing an isolated and vulnerable enemy alone, converge on the position and destroy the enemy unit by fire.  First blood to the Frogs!


On their right, the British horse gun moves up and begins to engage the square, but the British Cavalry spend several turns sipping tea as their frustrated Brigade commander can NOT get them to advance.  Dice are hell sometimes. hahaha


The battle for "The Hill of Death" rages into full honk with units charging, assaults locking up or forcing enemies back, and weakened units fall back to be relieved by fresh units joining the fray.


With some units being destroyed, both sides fall back for a breather and to get their units back in order, other than one brave British battalion that charges a weakened French unit.  He draws traversing fire that disorders him and adds a couple of casualties, loses the melee, and rolls a 4 for morale.  Broken and fled the field in ignominy!


On their right, the British cavalry has finally moved up and so have the French Dragoons.  A cavalry fight occurs between KGL Light Dragoons and French Dragoons with their Army Commander attached out in the ground between the Square and the Horse Gun.  The results are inconclusive and both formations retire to reform for round 2.


The "Hill of Death" is slowly taken by the French main attack as one complete British Infantry Brigade is destroyed in the vicious fighting there.   The French lose two battalions gaining OBJ B but are in firm control of the hill.
 

Near Objective A, the British Rifles have destroyed both French field guns with rifle fire without taking any casualties!  The French Legere unit, about to be attacked by Rifles that have moved out to threaten it, redeem themselves by a gallant charge to the rear of the enemy field guns that have moved up to threaten the French center and destroy the enemy artillery.  Way to go Legere dudes!


The final British unit sent into the woods on "The Hill of Death is destroyed, taking its Brigade commander with it.  Objective B belongs to France.


Cavalry Battle, Round 2, pits the French Dragoons again with the Army Commander in a charge / counter charge with the British Heavy Dragoons.  The French destroy the enemy cavalry unit, but are Shaken, and cannot follow up with a follow through attack!


This sets them up, horses winded, to be destroyed in another mutual cavalry charge by the KGL Lights and the French Army Commander dies with his cavalry.  The Ligne unit, still in square, holds the flank and prevents an enemy breakthrough move.


The French horse gun moves up to blow away the British horse gun.. just cuz.  :)


The British are left with 4 Infantry Battalions, 1 light horse squadron, and a Rifle Battalion in control of Objective A.  The French have 4 Ligne Battalions, 2 Legere Battalions, a Horse Gun, and control Objective B.   It's supper time, everybody had a blast, so we call it a DRAW and the battle is over!


A great afternoon with good friends.  Hope everyone had as much fun as I did!

From left to right, Bruce British Cavalry and Infantry Brigade, Clay French main attack infantry Brigade, Shawn British CinC, Infantry Brigade, and Rifles, Brad French Cavalry, and Tim French CinC and economy of force Infantry brigade.


Sunday, July 3, 2016

BLACK POWDER Napoleonics
 British vs. French at Cullison's Cards & Games
 
Having some new British I've not yet to had a chance to play, as well as just re-flagging them with colours from THE FLAG DUDE, I want to take my lads out vs. Monsewer Crapaud. 
 
 
Rifle Companies, Guard Battalion, and a Line Battalion

 
Kings German Legion and Hannoverian Battalions

 
Royal Artillery 9drs, King's German Legion Light Dragoons, and a Royal Horse Artillery 6pdr complete my force for today's battle, a meeting engagement with the French somewhere in southern France after the Allied army crossed the Pyrenees. 
 
The mission for both of these Advanced Guard forces is to push back or destroy the enemy to control the old Roman Road running down the center of the battlefield as it will be useful as a supply route for their armies.
 
My buddy Tim agrees to play the French, so let's get it on!


The British roll high and "outscout" the enemy so the French deploy first.  They have two entry points so they choose to put their infantry brigade, with their Division Commander along with them, on their left and their cavalry brigade on their right. 

 
The British, with only one entry point, are coming onto the battlefield Brigades abreast with the Cavalry on the left and the Infantry on the right.
 
 
The British have two elite units, Guard Infantry and Rifle Companies, but the French have one more infantry battalion as well as an additional higher level Division Commander which, as we'll see, will pay big dividends for them.  Their successful command rolls has the infantry brigade on their left moving up to engage the British who fail command rolls for a few turns and aren't able to move out and meet the enemy advancing on their position!  The French occupy the woods and both small villages to their front with the artillery taking up bombardment positions on the hill.

 
On the French right, their horse gun artillery engages the enemy and their brigade commander attaches to the Hussars, moving bravely out to the front to take shelter behind the hill with an old stone keep.  Frustrated by the infantry brigade's lack of aggressiveness, the British cavalry commander attaches to the Rifle Companies, moves them out to occupy the stone keep in the face of the enemy cavalry, and sends his horse gun up the road to provide fire support.  The withering "First Fire" at point blank range from British "Sharpshooters" as well as a couple of casualties caused by the horse gun, sends the Hussars fleeing from the field. 
 
First blood to the British! 

 
With the commander and cavalry gone, the British left flank moves up and destroys the French horse gun by close range fire from the 6pdr and the Rifle Companies. 
 
The enemy right has broken!

 
Things aren't going so well for the British on their right flank.  The Hannoverian battalion that has moved up to the edge of the woods in skirmish formation to try to slow down the French advance, is broken by concentrated fire from the artillery and two Legere battalions.

 
With his right wide open, the French Division Commander sends a Ligne battalion out to that flank.  It moves up and destroys the British horse gun and begins to punish the KGL Light Dragoons.

 
On the British right, a KGL battalion that moves up does not get the promised support on its left from the field artillery and Guards who fail Command rolls to advance.  The KGL is outnumbered and exposed, and it is also routed by concentrated enemy fire from 3 enemy battalions and two field pieces.

 
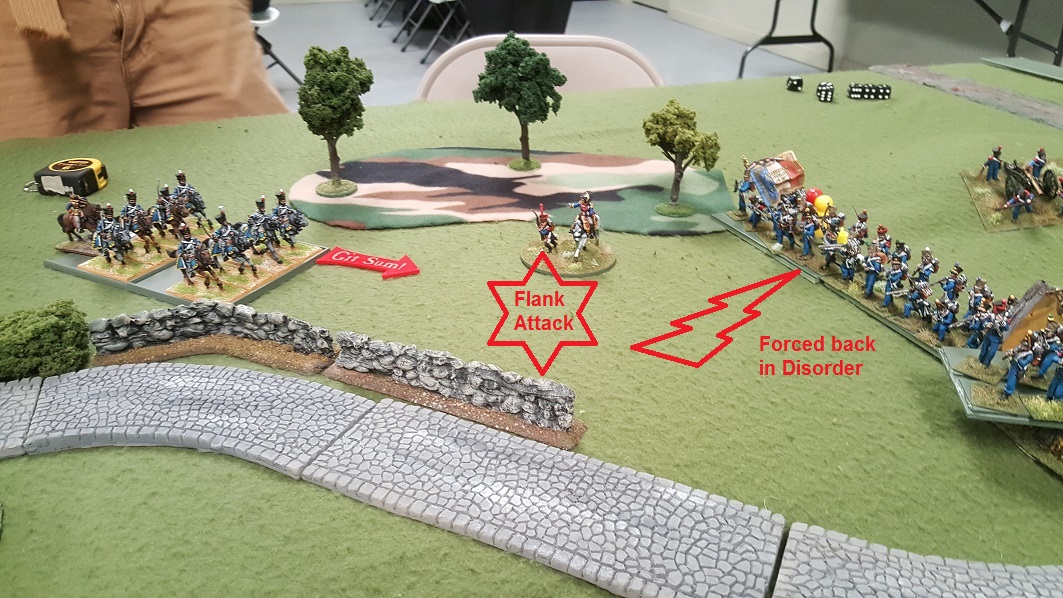
The KGL Light Dragoons charge the French Ligne unit, forcing it to square, and evade past it to hit the Legere unit in the flank.  The combat is sharp with the Legere unit surviving but being forced back in disorder.

 
Meanwhile, the Rifle Companies close range fire routs the French Ligne that has reformed into line to try to stop the cavalry that evaded past it and moved to threaten the right flank of the French infantry Brigade.  Way to go Rifles!

 
The KGL cavalry again charges its old opponents, the Legere, which are forced into square.  The cavalry, unable to close on the square, evades back and the square is then routed by concentrated cannon and musket fire.  Classic Napoleonic Combined Arms tactics WORK in these rules.. one of the reasons I like BLACK POWDER.   :) 

 
The Guard battalion finally moves up and forms line and, joined by the 9pdrs and the Line battalion, break another French Ligne unit by concentrated firepower.

 
The Rifles move up to destroy a French 6pdr but to no avail.  After the French fire of the final turn, the Rifles are the only British unit left on the field!  The French, not in much better shape, still have a Ligne Battalion as well as their Division Commander on the field. 

 
With no commanders left alive for the British,  we decide the Rifles disperse back to the rear to report the slaughter in the fight for the Roman Road.  The French claim Victory!